|
A Pallet Construction Primer, Page 4
Contents
Introduction
Pallet Basics
Pallet Disassembly
Pallet Construction
Pallet Construction Techniques
|
OK, so now you have a pile of slats, both long and short, and some rails and a whole bunch of shattered pieces. Other articles will discuss what you can build with these, this section talks about some general principles that apply to almost every pallet project.
| |
| |
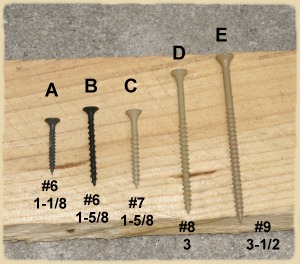
Screws
The biggest single decision you can make which influences success or failure when working with pallets is the choice of fastener. The only logical choice of fastener for most pallet projects is to use screws throughout. Shown to the right is a selection of screws we use frequently.
The first two screws (A and B) are drywall screws. We use these extensively throughout our pallet projects, with about a 10:1 ratio favoring the smaller to the larger. Screw A is a #6x1-1/8" fine pitch drywall screw. Coarse pitch would be OK also. The great thing about these little screws is that when you are attaching roofing to a livestock shelter you don't get any punchthrough that can injure the animals. Go into the attic in any modern home and examine underneath the roof sheathing, and you'll understand immediately what I mean. These screws also hardly need any pilot holes, except in circumstances we'll discuss later. Typically, then, you will use these screws to attach thin slat material to practically any substrate, including other thin slats, without worrying about penetration on the other side.
Screw B is a #6x1-5/8" coarse pitch drywall screw. These are great for attaching the thicker slats to more robust substrates. As mentioned before, we use many more of the smaller drywall screws, but the longer screws are a must-have in specific applications. A great thing about both drywall screws is that the #6 shank is so thin that you can easily drive them into the edges of even thin slats and get great holding power. Try that with a nail of any kind.
Screw C is a #7x1-5/8" deck screw, and is used in those applications for which you want a little more holding power than the longer drywall screw. Plus, in some applications we will temporarily attach a part to our projects, perhaps to measure some other part, and then take the part back off for more work and later reattachment. In those cases, tack the part with Screw B, and then use Screw C later for the final placement. The void left by Screw B makes a nice threaded pilot hole for Screw C. This happens rarely in our projects, so we use fewer of Screw C than Screw B. One five-pound box of these goes a long way.
Screw D is a #8x3" deck screw. This is useful for applications in which we are attaching one rail to another. It has enough length to give a firm hold without punching through. We always drill pilot holes for these through at least the top piece. A square drive head will prevent a lot of injury to the head of the screw.
Screw E is a #9x3-1/2" deck screw. This is useful for applications in which we are attaching one rail to another at an angle, and we need to "toe-screw" the parts together. In our projects we use about five of Screw D for each Screw E. It is essential to drill pilot holes for these. A square drive is also an essential choice here.
Screwconomics
Screws are cheap. Some home supply outlets sell 25 pound buckets of Screw A for about $30. Each of these buckets has about seven to eight thousand screws in it, so the cost per screw is a measly 0.4 cents. A twenty-five pound box of Screw D costs about $100, and contains around 1700 screws. That is about six cents each. Screw E will cost a little more, typically ten cents each for a few hundred. But, you will use so few of these that it doesn't matter.
Plus, if your project rots away, you can recover most of the screws and use them again. As before, try that with nails.
Whenever I'm at an auction, estate sale, garage sale or flea market, I look for drywall screws and deck screws. I recently bought three boxes of 10,000 drywall screws each for about $10 a pop. They had been opened, but less than about ten percent of them had been used. I'm sure they can be had for less if you pay attention.
For those of you who have read Starving the Monkeys (STM), or at least looked at the back cover, you know that I'm a fan of having stuff you can use (especially knowledge) versus relying on gold or other metals as barter goods later. Drywall and deck screws illustrate exactly what I mean. As I write this, gold is selling for about $1200 per ounce. A single ounce of gold buys about a million drywall screws at those auction prices I was talking about. Which do you think will be more useful, an ounce of gold, or a million screws? Let people burn through whatever fasteners they have on hand, and suddenly those pioneers burning down their houses to recover the nails won't sound so odd. Now, I don't recommend stocking up on a million drywall screws (which also make dandy fragmentation ... never mind). But, you should at least not feel strange by buying a box of ten thousand of them to then use a hundred or so to build a pallet house for your goats or chickens.
Pilot Holes
If in doubt, drill away! A bit size or two smaller than the shank of the screw in question works great. Drywall screws, with their thin shanks, won't usually need a pilot hole, unless in the last few inches of a slat. And then, don't sink the screw, just dent the material with the screw head. When attaching materials to the thin edge of an oak slat, drill a pilot hole through the piece being attached and then into the slat edge about an eighth of an inch. This will keep the screw from grinding off the hard oak at an angle. Deck screws will need generous pilot holes to keep from grinding away the screw head, unless you are using square or more exotic drive heads. Remember that these screws were designed to drive into pine decking, not hard oak. You might want to stock some drill bits from an auction or flea-market, too. Until you recognize the warning signs, you'll get them stuck, or break them outright.
| |
| |
Plumber's Strap
A great screw-based technology for pallet projects such as feedlots or compost bins is to use plumber's strap (or "those metal strips with holes in them"). Stock up on some of this, too, while you're at that auction. This kind of strap is sometimes called plumber's tape which is more accurately applied to that white Teflon stuff they wrap around gas pipes before screwing them together. The white stuff doesn't hold pallets together well at all!
Why Not Nails?
Because they suck. Pallet materials are flimsy enough, and contain enough native splits, that you don't even want to try using nails. There is a reason that carpenters prefer soft "sticky" materials like pine, and avoid splitty oak. Plus, the scrap pine and poplar that wasn't deemed good enough for lumber wound up in the pallet. That's also what makes pallets so cheap. Screws solve these problems neatly, and open up cheap pallets as a useful resource. Also, try pounding nails into an oak rail and you'll get the idea after you bend most of them over. And get the vice grips handy to untangle that brad gun after that little wire turns into an accordion.
Collapse? Power?
Yes, screws require power to install, or a whole lot of twisty arm action. Use some of that gold you've got stashed away to get one of the new lithium drills (get two, actually, to help with drilling pilot holes), and hit the local Goodwill store for a trashed computer UPS. In a future article we'll show you how to cobble together a solar charging system to keep those drills spinning. Or for that matter, power the whole thing off a car or mower engine running with pyrolysis gas. Review Chapter 6 of STM for a refresher on why energy is so important to survival and quality of life.
But before the collapse, there will be a long time where you are simply poor, and power will still be available. Screws and plumber's strap will be perfect for equipping your hovel with pallet furniture. Or for building the hovel itself ...
| |
| |
Stay tuned for pallet-based project articles, coming soon. In the meantime, check out the Tiny Pallet House site. We'll be taking a different approach with our pallets, but that site makes an interesting read nonetheless.
|
|
Shop our
or
or
|