|
A Pallet Construction Primer, Page 3
Contents
Introduction
Pallet Basics
Pallet Disassembly
Pallet Construction
Pallet Disassembly
|
In the previous section, we introduced the basic anatomy of a pallet. In this section we will discuss how to efficiently and safely recover the pallet material to use in our projects.
| |
| |
Tool Risks
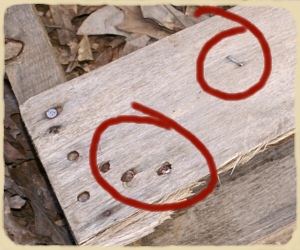
We're going to be using saws and drills on our pallet wood, but before we do let's talk about risks to these tools. Many pallet slats and rails contain staples used to hold wrap or straps to the pallet when loaded. Or, unexpected nails might be scattered around. See the photo to the right for an example.
Carefully inspect your pallet and remove any staples from the slats with a flat screwdriver or pry bar. Don't worry about abusing the wood, it has that rustic look anyway!
| |
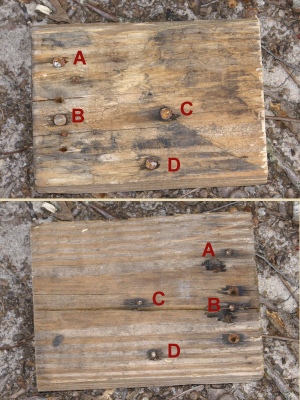
A much more serious risk is imposed by extraneous nail heads. The photo above shows two additional nail heads to the right of the rail. This is a relatively common phenomenon.
The photo to the left shows the front (top) and back (bottom) view of a section of slat removed from a rail. The nails holding the slat to the rail have been removed; their holes are still visible on the left of the top photo and the right of the bottom photo. Note however the additional nail heads (A and B) at the rail edge, and two additional nail heads (C and D) farther into the rail.
Apparently, pallets get rebuilt somewhere, with the slats sawed off the rails by cutting the nails. It's easy enough to pop these nail heads out, but eventually you'll tire of the sport and only remove them when they get in the way of a cut you want to make. Besides, they add to the rusticity.
More ominous, however, is that the old nail bodies are lying around in old reused rails. These will be practically impossible to remove, and if the wood happens to be aged or otherwise discolored to obscure the rust, you will probably miss those nail bodies in the rails. Be careful, and expect staples, nail heads and buried nail bodies at each cut.
| |
| |
Removing the Slats
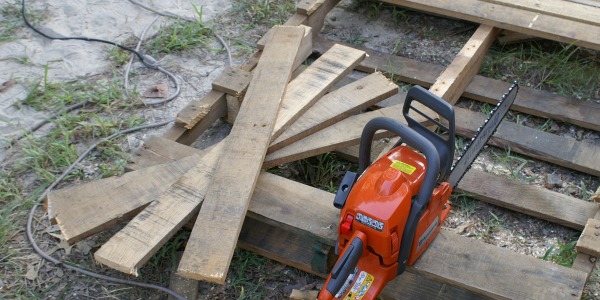
As mentioned before, a chainsaw is the best way to disassemble pallets into useable components. One might be tempted to use a Sawzall or some other kind of reciprocating saw, but a couple of minutes of trying that will convince you to grab the chainsaw instead.
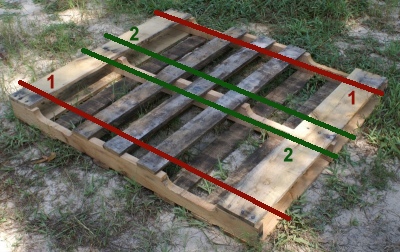
We then need to focus on where to cut, as much as how. We'll be making two different kind of cuts, as shown to the right. If we want to get relatively long slat portions, and the wood is in good condition, we'll make the two cuts shown by the red lines and numbered 1. If we want shorter rails, or the wood is in bad condition, we'll make the two cuts shown by the green lines and numbered 2. Regardless of which cut you are making, double- and triple-check before cutting. You don't have to cut each slat at the same location as shown, you can vary the cuts for obstacles, etc.
| |
Recovering Long Slats
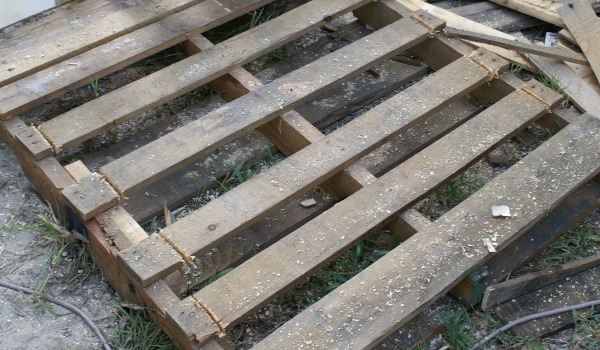
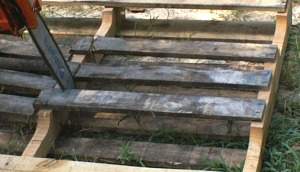
Long slats are useful for framing doors, etc. You will only want to try to remove long pallet sections when the slats are thick and in good condition. You also probably only want to try this with pine (or poplar rarely) on similarly softwood rails. Otherwise, the slat will simply splinter when you knock it off of the center rail (remember those fluted nails). In the picture below, we have cut this pallet in preparation for long slats.
After these cuts have been made, stand the pallet up, place a block of wood behind the slat next to the center rail, and whack it hard with a sledge. It will either come loose, shatter in a billion slivers if you try this with oak (always) or poplar (usually), or thin anything, or come partially out. If the latter, then use a pry bar and finish the job. The photo below shows that we recovered all four of these pine slats from the pine rails (our trusty Husky looks on proudly). Note also that we have removed the nails from these pieces. With a 42" pallet, you can get about three feet of usable wood this way, if you are lucky.
| |
| |
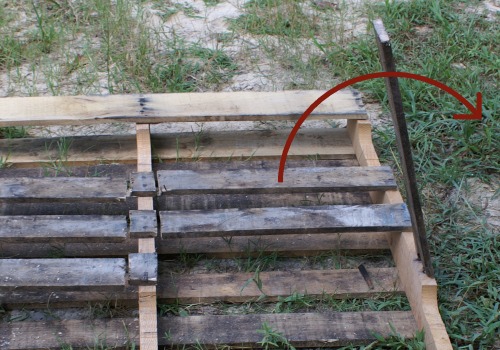
Recovering Short Slats
More often, though, you will recover short slats. These are great for most wall work and shingles, and you can yield about 18" from a 42" pallet, if you are willing to accept one end with issues. Short slats are also your only practical option for oak slats, or thin slats of any kind of wood. Here we are making the inner cuts with the chainsaw, again being careful to check for extraneous nails and staples.
| |
| |
Next, grab the free end of the small slat, and pull it up and past the rail, as shown to the left. One of three things will happen. The nail heads might pull through the wood, in which case you have a rustic looking piece of wood and you are done. Second, the nails will come out with the slat. You then only need a few seconds work with a vice-grip to straighten them, a hammer to tap the pointy end and a pry bar to pull them out.
The last possibility is that you get stuck. Wrestle with it for a while and then apply pry bar to work them free as needed. For slats that extend past the rails, you may need to apply the pry bar for all of them. These slats sometimes pull through, but again, don't worry about the holes, no matter how ugly they are. More rustic.
Don't worry if you crack the ends, either, for many applications they are still fine. With practice you'll discover what works best and be able to get about eighteen inches of usable wood. Otherwise, you can use the chainsaw on both ends and get fourteen inches with less trouble.
| |
| |
Assembly Line
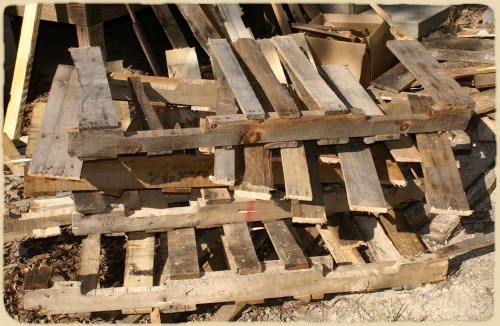
When collecting slats for shingles, you will want to prep a half-dozen or so pallets at once. First screen for potential long slats, and recover these. Then, with what's left, go ahead and make the inner cuts as shown. What results is a pile of pallet fractions ready for processing, as shown below.
Rails and Nails
The last issue involves removing the nails from the rails. When done pulling off slats, you're left with some rails with little slat stubs here and there, and a whole lot of nails heads poking out. The easiest way to remove these is ... don't. Just smack the slat stubs off with a hammer, and then knock the nails, or what's left of them, into the rail. In some cases, such as pine or poplar rails, you can pull them out with a pry bar relatively easily. Even so, you'll find that a lot of nail heads just pop off and you have to pound them in anyway. You could use a vise grip to make a head for the pry bar, but in most cases it's not worth the effort. Regardless of whether you think you've gotten all the nails out, take care when cutting the rails later.
Note also the carton in the background. We collect all the scraps and will use them for kindling in the winter.
| |
| |
In the next section, learn about pallet construction techniques.
|
|
Shop our

or
or
|